Back to Contents
Back to DCC
Link to Sitemap
On-board power for Zimo DCC decoders
Zimo decoders are great. Not cheap - but then the best never is. One of the really handy things with the Zimo decoders is that they can be fitted with on-board capacitor power packs. Okay; so what's an on-board capacitor power pack and why would I want one?
It is true to say that modern DCC systems tend to run better than analogue ones. The tricky running is at low speed where an analogue loco is not only fighting internal friction but also having to contend with it's power (a few millivolts at a few milliamps) having to fight it's way across the wheel/rail boundary. Under these conditions DCC is the better bet with a constant 16+ volts at around half an Amp (and AC at that) which solves the power problem. Most of the time. Sometimes, particularly in an exhibition environment, it can be very handy if the the loco carries some power with it to keep running over dirty/dead spots in the track.
Of course you're going to mention the Lenz 'Gold' decoders and 'Power1' modules. And that's a fair point. But the Zimo decoders need not be any more expensive than Lenz 'Gold' decoders, and their power packs can be built for pence.We hope to return to the Lenz 'Gold' and 'Power1' combination at some point in the future. There's no doubt that that the running of the 'Gold Mini' and 'Power1' is amazing, and it's small size means it can be fitted into even small locos. But if you've got a little more space then the Zimo (+ power) is a very attractive proposition.
Now we're looking at a lot of space in our example. The loco is a Broadway C-16 2-8-0 in On30 (0-16.5). Despite all positive that has been said about the Quantum (etc.) decoder in the Broadway locos we thought the running was, erm, pants. So the supplied lights, sound, and drive decoder was ripped out (email Dave if you're interested in it) and the decision was made to use the loco as a test bed for the Zimo MX64 with a large power pack. And this is a very large power pack, though to be fair it would still fit into either an American HO tender or if compressed slightly in a British 00 one. The first loco to receive a power pack was actually my BR212 electric loco. The large size and logical layout means the pack fitted to the C16 is a good example, so you can see what we did. :-)
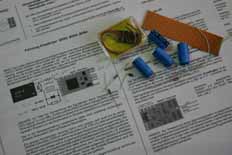
1. The starting point; instructions, strip-board, your Zimo decoder, a few lengths of wire, a bunch of capacitors, resistors, a choke and a diode. The parts are clearly identified in the instructions. Yes, Dave is showing off by using the German instructions; they're also available in (perfectly good) English. The capacitors must be rated at least 25v. These are 35v 1000uF types. Apart from the decoder it's all readily available at Maplins.
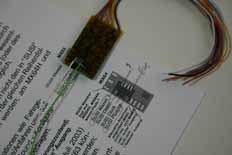
2. The trickiest part of the job is soldering wires onto the SUSI pads on the back of the decoder. Use a hot, fine iron; tin the wires and then apply the iron to the wires held in place on the decoder. Capillary action will do the rest. For the non-German speaker Pluspol is the Positive, Masse the Ground. And like I said in the previous paragraph you could use the English instructions.
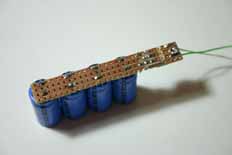
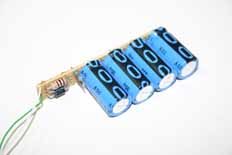
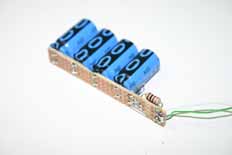
3. This is the meat of the power pack. You can see that the capacitors have been soldered into a section of stripboard. They're all the same way up according the their marked sleeves. A section at the end of the stripboard was 'gapped' with a drill to break the copper track; the choke, 100Ohm resistor and diode are soldered across the gaps. You can see how two of the tracks have been joined either side so that this resistor is in parallel with the diode. The other resistor is the 3K3Ohm one that has effectively been soldered across the capacitor terminals. In case it's not clear in the middle pic; the diode is oriented with the band to the left.
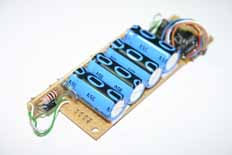
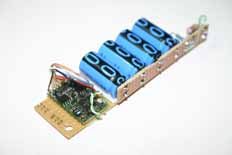
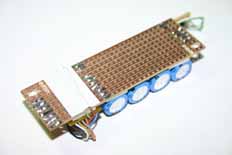
4. The powerpack and decoder are fitted onto a base board with stickypads and then the various wires for the front and rear headlights, powerpack, track pickups and motor feeds were connected through. The bottom section of board had already been gapped and drilled ready to be fitted to the die-cast tender underframe. Terminals were connected onto the base board using loops of wire. These will give somewhere convenient to solder the various wires onto; rather than having to join wires. The last decoder job was to insulate the wires for the 3rd and 4th (unused) functions so they wouldn't cause any harm by coming into contact with anything conductive.
Of course this shouldn't be attempted purely on the strength of this webpage. Download the instructions from Zimo's website (see our Links page here) and only try to build your own power pack if you feel confident to do so. I should also mention that even much smaller power packs can work very well. I've got the odd one or two fitted to an occasional slightly troublesome loco, none are anywhere near as big as this 4000uF brute. With a coreless motor even 250uF can be useful and you don't necessarily need the resistors or diode if the power pack is that small. Again - full details are in the Zimo instructions.
And don't be tempted to try and fit a powerpack like this to a Lenz 'Gold'. It won't work. And just a quick pointer - whether it's a 'Gold' with a 'Power1', or a Zimo with a home-brewed power pack; neither will work unless the decoder is set for digital-only operation in CV29.


