Back to Contents
Back to Railways Page
Link to Sitemap
WLB ADtranz (Ex-DR) V100
92
The Wiener Lokalbahn is a private railway (and tramway) operator in Vienna. They have now got into the open-access rail freight business and operate over much of Austria and Southern Germany using their fleet of locos. They have an interesting roster including several Siemens ES64U2 ('Taurus') electric locos on long-term lease from Dispolok together with an ER20 ('Eurorunner' or 'Hercules') diesel, though this latter loco seems to have gone back to Dispolok in about 2005. They also own a small number of other locos including three Ex-DR V100 diesel-hydraulics that were fully rebuilt by ADtranz. These latter locos were the subject of a model by Brawa which is to their customary high standards.

This model shares a mechanism with the DR versions of the V100 that Brawa produce. In simple terms that means a smooth and powerful little loco. The bodyshell, however, seems to be completely new and is detailed specifically for the WLB version of the ADtranz V100. As you'd expect, it's nicely done and certainly looks the part. So why is it here if it's that good - what am I doing to it? Well, it has one small (but very noticable!) detail missing and will need general preparation for my unholy combination of DCC and Kadee couplers. It also has a bit of an 'Achilles heel' which I wanted to sort before placing the model in service.
I also wanted to get some finer wheels on the loco if at all possible. I actually don't consider the Brawa wheels to be too bad. But with the rest of the stock for this project being re-wheeled to the RP25-88 standard it was desirable to do this loco as well. Even if only to guarantee consistent running with the other stock on the layout.
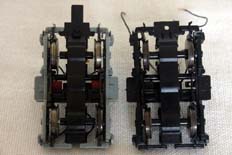
So the photo above illustrates the re-wheeled V100 bogie (on the right) next to one I quickly removed from a stock DR V100 (on the left) for comparison. The finer wheels are quite noticable and so too is the Achilles heel referred to earlier - the traction tyres. The model has two of these and although they help the small and relatively light loco haul terrific trains they also seriously reduce the pick-up area which is needed because the model is relativley small. I'm not the only person who's found this to be a problem and I've been led to believe that Brawa will happily and freely provide replacement wheelsets if you want to remove the traction tyres. Certainly an option I was considering until I worked out how to fit a set of replacement Black Beetle wheels.
I'm afraid I didn't take any pictures as I went through this re-wheeling job. To be honest I wasn't sure how well it would work and wanted to spent time at the bench fiddling my way through it rather than worrying about whether or not to take a photo. None the less I can give more than a feel for what I did as most of the work is pretty obvious in the pictures or can be described easily.
This is a fairly fiddly conversion - much of the bogie is clipped together and I'm sure it's possible to damage the parts if you're not careful. It will take more time than you think you'll need too! You have been warned - if you don't feel up to it, don't do it!

There is some disassembly required to get to the point where the bogie can be released from the chassis. The body will have to come off. The wires for the bogies and the motor can be unclipped from the circuitboard and then the screws, one at each end of the weight/circuit assembly, can be removed which releases the weight/circuit assembly in one go. The bogies are retained in the chassis frame by the gear cover clips over the top of the worm gear - so these need to be unclipped before the bogies drop clear.
Once you've done that you'll have a selection of parts (remember where they came from?) which will include two bogies. Now it gets fiddly. To put it simply you'll need to carefully unclip the bogie ends and the baseplate/cover from the gearbox. It's not straightforward; I ended up using a couple of small jewellers screwdrivers. This is required even if you're going to replace the traction-tyred wheels with plain ones from Brawa. This complicated construction is because the loco uses a split-axle arrangement for pick-up. Not a bad idea in itself as it's a maintenance-free way of ensuring good running as there's no wipers to go out of adjustment. The wheelsets removed from a bogie are on the right of the photo, as you can see the half-axles and wheels simply push into the long muff of the central Delrin gear.
This is where I started wondering how I was going to fit replacement finer wheels. In the end it dawned on me that I didn't have to keep the split axle arrangement - I could use a set of wipers...

So with that thought fresh in my mind I popped out of their packet the four axles of Black Beetle 11.5mm RP25-88 wheels with 'Lima-length' axles. By holding the two frames together with the replacement wheels in place between them I could see that the bogie width was coming up only marginally wider than with the original wheels. Some carefull work with a countersink bit removed enough material from the inside of the bearings so that the pin-points of the axles could sit in. This required each set of bearings to be done individually, removing a little from each of the cups until the replacement wheels sat in with the tiniest amount of running clearance.
That had the wheels in the frames - now what about drive and pick-up? I started to think about the drive first. In the end I decided to drill through the gear 2mm diameter to take the Black Beetle axles. Using a brand new 2mm drill I worked from each end of the muff until I had worked my way through the entire gear. Delrin being slightly flexible I knew that the gear, once drilled, would grip the axle securely enough without needing any retainer.
Unlike most of the other re-wheel projects I'd undertaken recently, this loco relied upon keeping a good set of pin-points on the axles. Usually I have the 'fun' of removing them entirely!. So I made a 'drift' from a small length of 1/8inch copper bar that had it's end drilled about 1mm. I used the copper bar to tap out the axle from the plain (un-insulated) wheel thereby preserving the running of the insulated wheel with its soft plastic centre and keeping the pin-points in running condition.
The wheels were then re-assembled. Starting with the gear I then used a medium thickness 2mm axle spacing washer from Alan Gibson as a spacer before the plain wheel was pressed back on. The gauge was checked against the RP25 specification and that was pretty much that. Just the wipers to make up before clipping the while thing back together again.

There's nothing particularly clever about the wiper arrangements. As you can see in the photos on this page it's simply a length of 0.33mm brass wire soldered onto a scrap of copper-clad paxolin. The black insulated wire is the original, unclipped from the bogie frame. So the wiper is made up and glued to the side of the gearbox with a little Devcon 2-ton. The paxolin and gearbox will need a good de-greasing (lighter fluid is good here) and then keying up with emery paper before the glue is applied and the pick up plate pressed into place. The brass wire wiper was formed up and trimmed off after fitting, but before the wheels and other components were fitted.
It's then a case of re-assembling the bogies. Make sure the wheels are the right way round in the bogie, otherwise you'll end up with a short circuit. Take care to ensure that the sideframes are 'home' in the gearbox before pressing the bottom gearbox cover in place, otherwise you may find that the sideframes aren't locked in to the gearbox itself.
Job done. It's all fairly straightforward to re-assemble from here! I'll update this and/or future pages as the rest of the detailing takes place.


