Back to Contents
Back to Railways Page
Link to Sitemap
CNR GP9 Phase III
#4346
Fiddling with a Proto 2000 GP18 to make a Canadian National GP9 Phase III. Well, that's the general idea. After locating the GP18 model it soon became apparent that CN never actually owned any GP18s, 4346 is actually a late GP9. Like many of CN's GP9s she was delivered with Flexicoil trucks which would mean having to modify or build a new chassis to make a scale model.
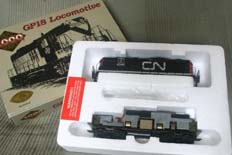
The model as delivered is a standard GP18. In this case it comes in a brown box which indicates it's an early release. So a few things to watch out for with that; the probability that the loco will have split axle gears, the coupler mountings are cast into the chassis like an Athearn 'Blue Box' model and no preparation for DCC.
The axle gears are relatively easy to solve - spare parts are free issue from Walthers, but don't throw the old ones away, you may need them later. I've modified some of these early locos to use conventional Kadee coupler pockets and #58 couplers. And as for DCC - well there is room for a decoder in the short hood. But of course none of that matters to us because we're building a new chassis...
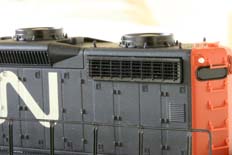
The main spotting difference between a G18 and a late GP9 is in the radiator grilles. The GP18 has grillework over the radiator shutters, while GP9s have 'chicken wire' mesh. Life-like did a good rendition of the GP18 grilles with the radiator shutters behind and usefully for us it's actually a push-in part.
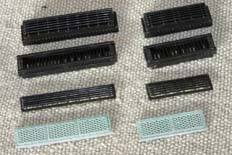
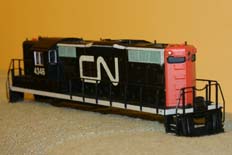
In the process of building this model I ravaged a spare Atlas GP7 body. It has provided a number of parts; grilles, louvres and a door. The rest of the model is destined for use elsewhere so it's been a far from wasteful process. One of the really good features of the Atlas GP7 is the radiator grilles. If they're cut to their outlines they'll almost drop straight into the GP18 body shell.
I found that if the shell was carefully de-burred around the inside of the radiator openings then the smaller of the grilles were a direct, firm, fit. Which is pretty much as required. Running liquid 'thin' superglue around the join from inside the shell will soon fix them in place. For the larger radiator grille I found I needed to reduce the length of the opening in the body side by about 20/1000inch (0.5mm). So a scrap of plasticard was glued inside the front edge with Plasticweld and then trimmed flat against the side of the nose after it had dried. The grilles could then be fitted in the same way as before.
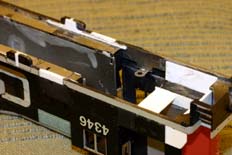
The photo above shows the bodyshell with the new grilles added, the plasticard packing can just be seen. You can also see how I rubbed down the mould part lines on the nose - it's moulded in grey plastic so clearly visible. The rest of the loco is moulded in black plastic, so although the short hood and cab have both been similarly treated it doesn't show anywhere near as clearly.
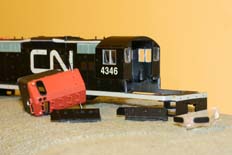
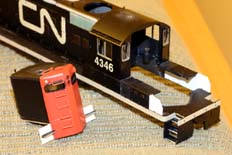
Welcome to pedants corner! There are a few differences between our chosen endpoint (a model of a GP9, CN 4346) and the details portrayed on the P2K GP18. Having done the major work of converting a GP18 to a GP9 it's now time to look at the specific details as apply to this group of Canadian National locos. Like the battery boxes.
By flexing the bodyshell around the short hood I was soon able to break the glue bonds and remove the short hood from the model in its entirety. The next stage is to separate the battery boxes; I used a microsaw to make a cut vertically down to the solebar just in front of the cab. The next cut was through the front area horizontally just above the front deck. I then scored along at solebar height inside and outside the battery box. Flexing the battery boxes relative to the solebar then caused them to snap off at the score line.
The parts can then be cleaned up to straight edges with needle files. You'll find that the best option for re-fitting is actually to swap them round. Comparison of a few photos with the original model (look at where the stanchions are) will help work out how it all fits together. They can then be trimmed for length and stuck in place. With all the fiddling around in this area I was left with the odd gap or two, I'll be using a couple of scraps of Cannon safety tread to tidy it all up later. Any joins that are too obvious can be filled and/or polished smooth.
There are a couple of bits of plasticard required to complete and strengthen the parts before they're re-assembled. You can see much of it in the picture - most of it is in 20/1000inch (0.5mm). The parts include the new stepguards with dimensions cribbed from a conveniently handy P2K GP9. There also the panel behind the steps which was attached across the back of the nose. And then it was simply a case of adding enough reinforcing behind the modified battery boxes so that they had adequate strength when fixed back to the body.
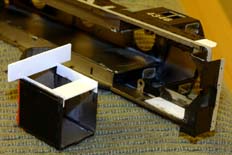
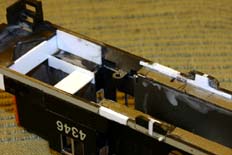
I noticed on the couple of photos I have of 4346 that it has a fairly conventional GP9 short hood, which includes a couple of louvres on the middle door. I decided that the easiest way of doing this was to drop in the Atlas door from the GP7. So it was carefully cut from the Atlas shell, and the P2K short hood was chain drilled around the inside of the edge of the door. With most of the door cleared, the hole can then be opened out to the edges of the door. The Atlas door is a little too large to fit in the resultant opening so it was trimmed and filed down until it fitted firmly in the hole. The now-customary brush full of Plasicweld appled from behind soon sealed its fate!
There was one last job to do before re-installing the short hood. I cut a piece of scrap plasticard to go across the lower edge, inside the hood. This will be cut away once I'm certain all the parts in this area are nice and solid. It's just there to hold the cab and hood nice and solid as the assembly hardens off.
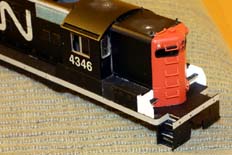
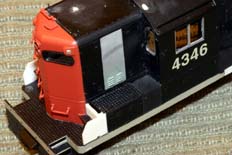
These two shots show the assembled short hood end before the safety tread has been added, or the area filled and dressed down.
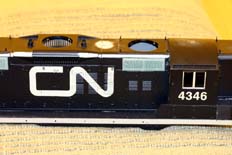
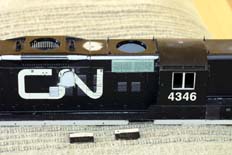
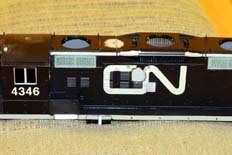
There are a couple of CN-specific details to get sorted now, including the bodyside louvres. This applies to all CN GP9s - the ventilation arrangements were altered from the standard outline so that the 'Canadian National' lettering of the green/yellow scheme didn't go across the louvres. So here's a nice 'before and after' view. The surplus grille was trimmed off with a curved scalpel and the door rubbed down with fine wet and dry paper (used wet). The new louvre was cut from the Atlas GP7 'shell, trimmed down to the same size as the P2k originals and pushed into a hole cut in the new location. Again, the aim is for a tight, firm fit so that solvent can be brushed in from behind.
There's also the small matter of the fuel tank fillers and gauges. These need removing from the original shell, modifying and moving. The location of the ammended gauges and fillers can be ascertained from the position of the stanchions - again you'll notice that the stanchions aren't in quite the same places as the standard versions of the GP9 or GP18. There is some care required to remove these parts without damaging the safety tread. I used microsaws for most of this work, cutting either side of the filler and gauge panel and then running the saw in at an angle under the running plate.
The gauge and filler panels can then be trimmed up and cut through - a piece of 60/1000inch (1.5mm) thich plasticard does well to re-space the panel. The bottom edge of the valance can be trimmed off flush and a gap cut in the valence for the modified filler and gauge panel to move into. The any remaining gaps can then be packed in with scrap plasticard, I'll fill and rub them down later.
I'll come back to the detailing and finishing of the bodyshell a bit later on. Before it all gets too far I thought I'd better get the chassis started to make sure it would fit and work with the bodyshell.
Click on for Page 2


