Back to Contents
Back to Railways Page
Link to Sitemap
If you want to get back to the previous page, click here...
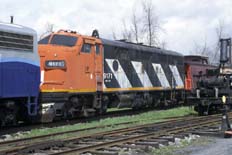
And here is the subject of these few pages. One of the joys of modelling Canadian outline is that I can make models of locos I've seen and photographed. #9171 is at Exporail (the National Railway Museum in Canada) at Delson, Quebec. I last had the opportunity to visit in 2002 when I took this photograph.
It might be useful to explain a little of the history of #9171. Originally built as part of a order for Grand Trunk Western (a CN subsidiary) as an F3, #9013, she was delivered in the CN-derived green and yellow livery. A later rebuild saw her updated and modernised (the 'u' and 'm' in the F7Aum designation) with F7 equipment, including the ventilation louvres between the porthole windows.
One of the features of this loco that's very obvious in photographs is the cut away of the skirt from around the fuel tank. Of course, you don't have to model this at all; of course I did! I chose to modify both the Highliners 'shell and the Athearn chassis - to be honest it was to see if it was possible. It is - but it's hard work. In future, if I model F-units with the skirting cut away I'm likely to completely remove the fuel tank and/or battery boxes from the Athearn frame and use a set of parts from Hi-Tech Details...
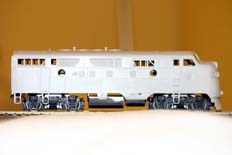
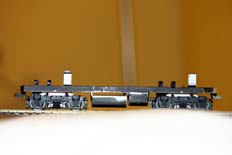
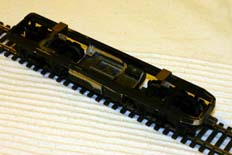
Cutting around the skirts of the bodyshell isn't difficult, though some care will be needed to get a nice, neat shape. As you can see from the photgraphs I also cut a couple of slots in the frame, one vertically between the fuel tanks and battery boxes and one each side between the fuel tank and frame.
The vertical slot is actually quite simple, a hole was drilled each side in the web cast between the battery boxes and fuel tank. With the chassis upside-down a junior hacksaw was then run in against the fuel tank until it met the holes; a second parallel cut was made against the battery boxes and that was pretty much it. A needle file was used to remove any saw marks. This is one job I'll continue to do - even to locos with intact skirts.
The slots over the fuel tanks are far trickier. The first problem is working out the dimensions, the second problem is actually putting the slot in. I did manage to work out some dimensions from drawings and photos, making the fuel tank around 10mm deep. The slot was done by chain drilling a line of holes in the area to be removed and then using a carborundum slitting disc in a mini drill to join the holes, before using a warding file to smooth it all down. Not easy; for a start I got through four slitting discs...
And yes, I know the front truck is the wrong way round in the chassis in some of the shots, I'm sure you get the idea of how the fuel tank slot works from the photo anyway. Also obvious is the amount of fresh air between the bottom of the body and the trucks; there should be some framing in there somewhere!
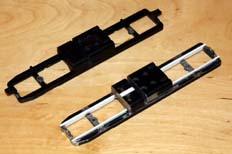
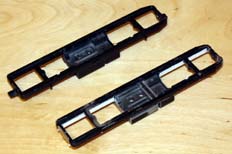
And this is how the framing starts to go in. To begin with it's all fairly straightforward, two 20/1000" strips, one each of 5mm and 3mm are stuck together and a flange added to it from a 1.5mm wide strip of 10/1000" plasticard. Lengths of this stock are then cut and trimmed to fit the frame sections over the trucks. They can then be glued in place; using these strips should have the bottom of the framing about 1.5mm below the die-cast frame member - a overall height in the region of 6mm. As you'd expect I used epoxy to stick the plastic parts to the frame.
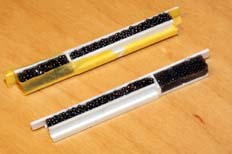
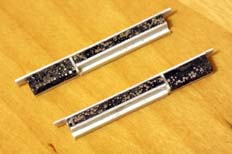
For this model, with the cut-out over the fuel tank it all get s a bit more complicated. Filler pieces are required to fit over the top of the fuel tank. These use a 6mm thick section of 40/1000" with the flange of 10/1000" added as before. The length is cut off to fit inside the fuel tank and battery box well in the Athearn chassis before a strip of 2.5mm x 40/1000" is stuck across the top. With a little trimming this assembly will fit inside the chassis; I added some more filler pieces for strength before filling the voids with a mixture of 'Liquid Lead' and epoxy. The (yellow, Tamiya)masking tape is there to hold it all together as it cures.
The main reason I haven't focussed too hard on the details inside the chassis is because they're only required if you're doing a cut-away fuel tank skirt and hacking the Athearn chassis about. As I mentioned earlier; the Hi-Tech Details parts probably make more sense if you're modelling a loco without it's skirts!
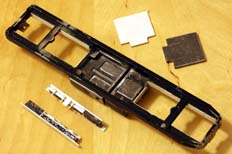
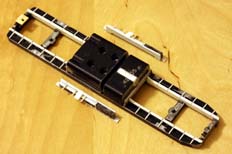
The next job on the main frame is the add the ribs across the frames. For these I used 20/1000" plasticard a strip of 1.25mm was cut off long enough to provide 30 6mm length ribs. There's then a choice - the ribs can either be formed on the strip (they taper down to 0.5mm at the end) then cut off and stuck in place, or they can be cut off the strip and formed with a file after they've been stuck. I chose the former method, trimming them with a sharp scalpel - having a couple of sets of dividers (one set to 0.5mm, the other to 6mm) helps keep the shape consistent.
As you can see in the photos, the ribs were also stuck to the filler pieces to go in the fuel tank and battery box - there's also an angled plate in there; this is made from a 3.5mm wide strip of 20/1000" plasticard. The lead and styrene shapes are used to in-fill the fuel tank to get it up to its full thickness - I didn't want to use filler. You can see that the battery box has already been filled with some lead and so has part of the fuel tank
The other details visible come from the Details West kit for detailing the Genesis/Intermountain/Highliners a-unit; there's lots more in there but included are tank brackets and the air tank end, the latter is heavily trimmed in this case.
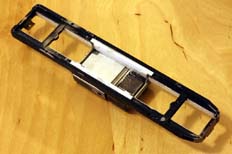
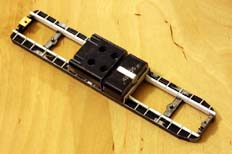
This is pretty much it for detailing. I know it's not wired, properly ballasted or got an intact drive system; but I'm very pleased with how it looks from underneath. You can see a few more of the Details West parts, including the fitting of the third fuel tank bracket between the fuel tank and the battery box.
Needless to say there's some thought required to get the assembly in the correct order around the fuel tank - first the tank ballast and packing to fill the fuel tank. After cleaning up any excess adhesive the in-fill pieces can be fitted and clamped firmly in place. After that little lot has cured then it's the turn of the third tank bracket - spaced and kept upright while it cures using a couple of strips of scrap plasticard.
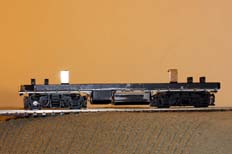
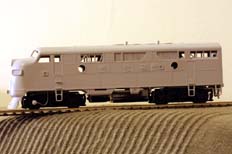
And just to show how worthwhile it is putting all the framing in: you can't see any of it! Well, not actually true; just like on the real thing it's there if you go looking for it. I'm enormously pleased with how it's come out, if truth be told.
By this time the trucks have been detailed too; the speed recorder comes in the Details West detail kit, the air cylinders and suspension hanger are the Athearn parts, it's very worthwhile taking the time to clean them up before fitting to remove any part lines. The air brake lines have been made up from 0.33mm brass wire which is glued into holes drilled in the ends of each brake cylinder. And the sand pipes are 23A (0.6mm ish) fuse wire - note that it's only provided for the leading wheelset on each bogie.
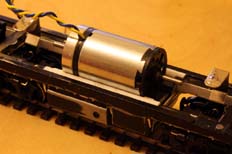
And now you can see why I went this route for the chassis! The motor is a monster 2230 Maxon coreless. It's very powerful and can only really be used in cowl units (and I also use them in my 0-gauge stuff!). This particular motor is an 18v type - fine with DCC if driven by a decent decoder. Don't try it with normal analogue though - you won't get any faster than walking pace!
The in-fill pieces have had notches in them to take the motor; this is part of the reason why they were loaded with 'Liquid Lead' and then fixed securely with epoxy. This may be a big motor, but being coreless there's no real need to use flywheels and the current draw will be tiny. The drivelines will need modifying, which we'll come on to later. There are a couple of other jobs to sort out on the chassis including the cab interior and some ballast to get the loco up to a weight that's comparable to the other locos it'll run with.
And while I think to mention it - by 'decent' decoder I mean ESU in this instance. Yes, they're the makers of LokSound. More will follow shortly... ;-)


